
Advertising PWAs via Facebook
Progressive Web Applications (PWA) are websites converted into mobile applications that run directly in the browser. A PWA acts as an intermediary between a web page and a native application while retaining the latter's key features: adding a shortcut to the desktop and sending notifications.
Installing a PWA is possible without the risk of blocking in just a few clicks on any platform. This ensures quick and convenient access to the product for the player.
The user goes through the following stages:
- a targeted advertising creative on Facebook;
- a black page with a PWA download button;
- the PWA itself, from which the user can navigate to the product website.
In this material, we will explain how to create your own PWA from scratch, connect it to the Facebook ad account, and launch an effective campaign.
Advantages of driving traffic to PWA
The benefits of driving traffic to a PWA include:
- a short funnel and simple user journey;
- easy launch;
- advertising campaign expenses are easy to track and optimize;
- ad campaigns are rarely canceled and even more rarely blocked;
- PWA is significantly cheaper to develop than a native application;
- it is easier to re-engage and retain players through push notifications.
What sources to use for traffic generation via PWA?
The main traffic sources for PWA are Meta Ads: Facebook and Instagram. Less popular platforms can also be used:
- any social networks;
- Google Ads;
- TikTok Ads;
- Bigo Ads;
- Push networks;
- SEO;
- other types of contextual targeted advertising.
Choosing a GEO
Selecting the region for launching an advertising campaign affects the creatives and targeting settings. When choosing countries, consider:
- access to the advertiser's platform in the selected country;
- possibility of free access to Meta products;
- stability of payment methods.
Another important criterion when choosing a GEO is the cost of a deposit. In low-income countries (Tier 3), a deposit will be cheaper, whereas in high-income countries (Tier 1-2), it can be significantly higher. It is important to consider this when testing a campaign to avoid overspending and rapid budget depletion.
The choice of GEO also influences the traffic generation strategy. For Tier 3 countries, it is recommended to work at "break-even" or a slight profit with large volumes, as the revenue per player rarely exceeds their cost. Therefore, the main goal is to attract high rollers (large players) who will increase the overall revenue. In Tier 1-2 countries, you can focus on generating profit from each player.
Creating a PWA using pwa.market as an example
The application for work can be rented, ordered on a freelance exchange, or created independently. The fastest and most convenient method is rental. Among the most reliable rental services are pwa.market, pwa.group, and skakapp.com. Most platforms support working with postbacks for optimizing ad campaigns and integrating with Keitaro. This simplifies setup, increases conversion, and helps boost revenue.
Creating a web application on PWA.market is available:
- using your own domain;
- using a domain provided by the service.
Service domains are less reliable as they may have been involved in blocked campaigns. We recommend using your own domain.
Launching a PWA with your own domain
To purchase your own domain, you can use hosting providers such as porkbun or zomro. When choosing a domain zone, consider the GEO:
- for Asian countries: .asia, .io;
- for African countries: .ac;
- international zone: .com.
Next, go to pwa.market, select the section "Funnels" → "Create New."
Then, select the option "I have my own domain" and log in to your account on cloudflare.com. If you do not have an account, create one.
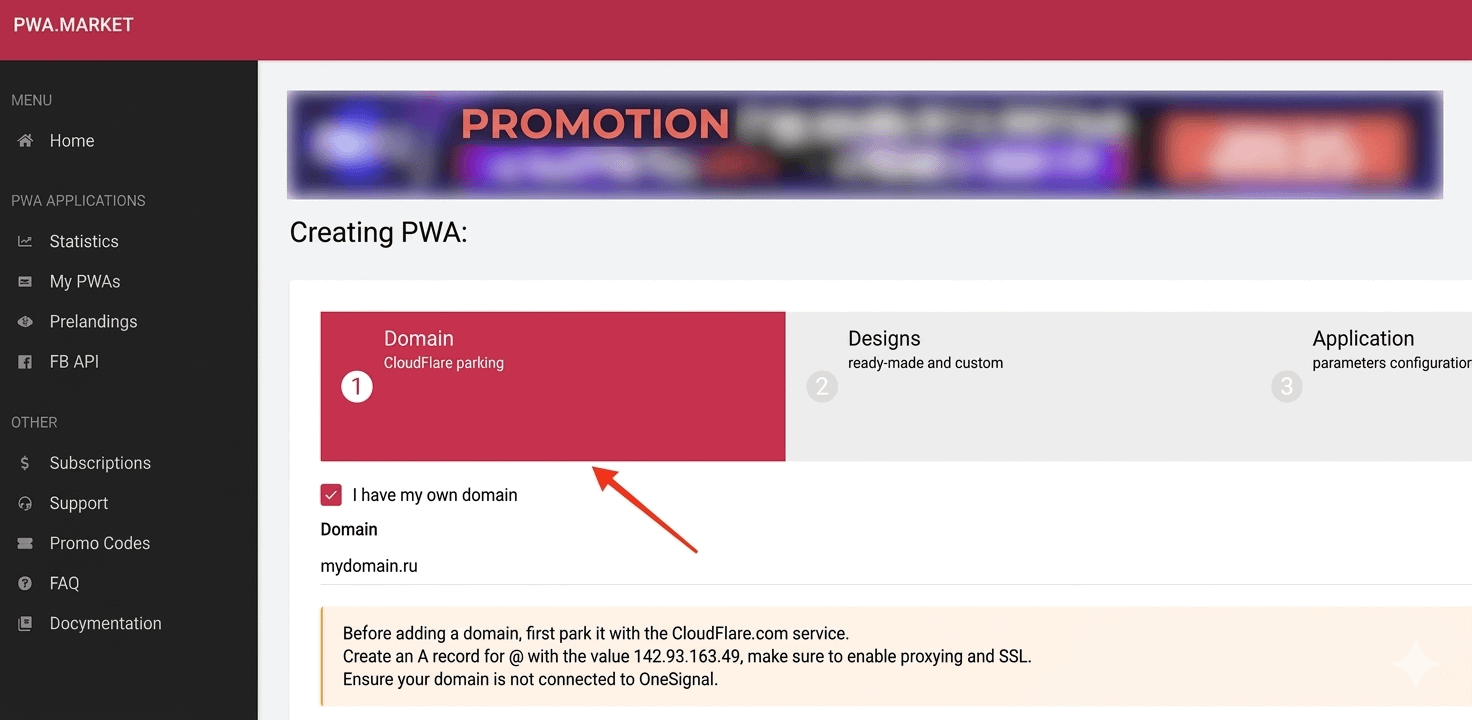
Connecting the domain to Cloudflare
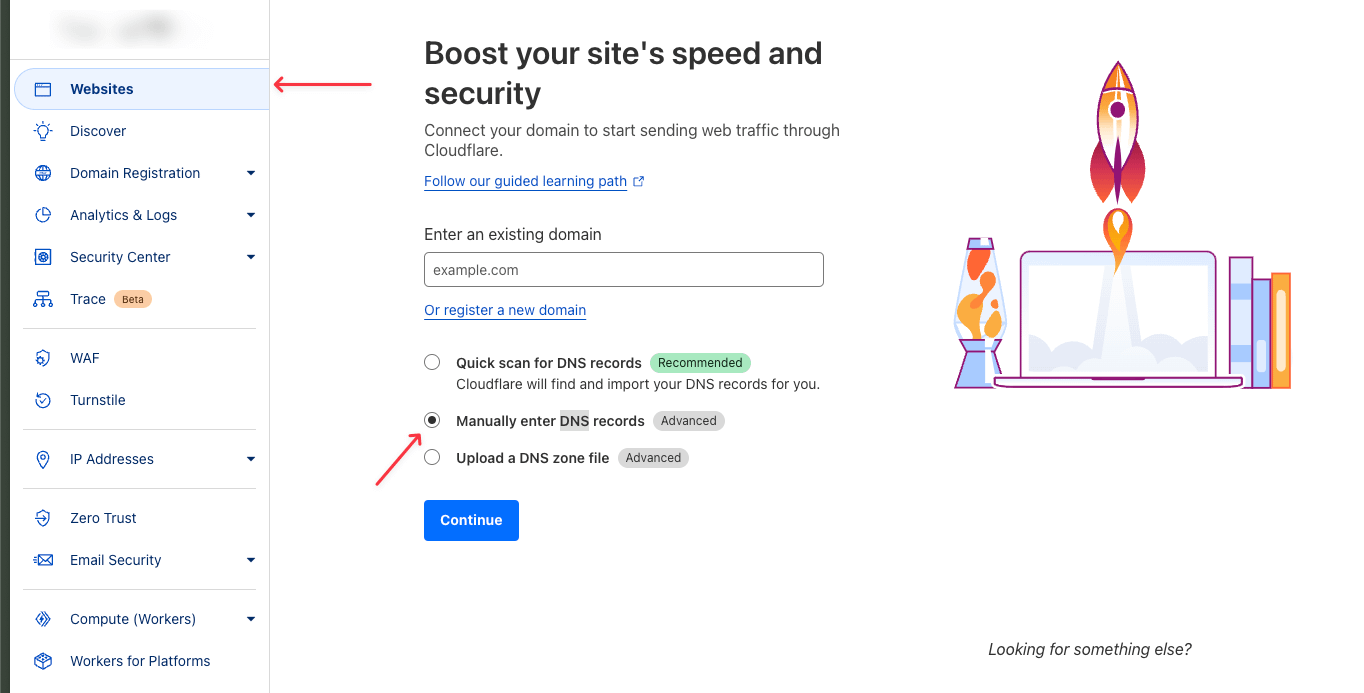
Sequence of actions in Cloudflare:
- Click "Account Home" in the left menu.
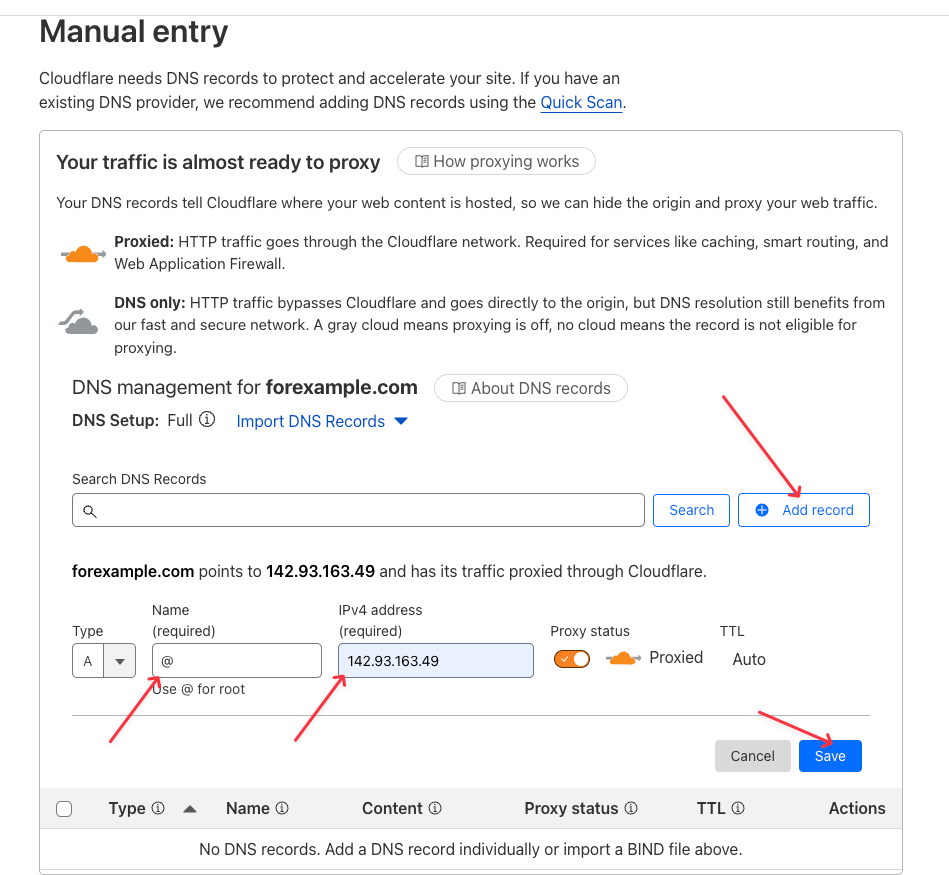
- Enter the purchased domain in the field that appears. This same domain will be used later in pwa.market when creating the application. In the same menu, select "Manually enter DNS records".
4. Click "Add record" and add the following record:
- type A;
- name: @;
- IPv4 address: 142.93.163.49.
Do not forget to save the record by clicking "Save".
5. Go to the "Overview" section, scroll down to the "Your Assigned Cloudflare nameservers" section, and copy the two nameserver (ns) records.
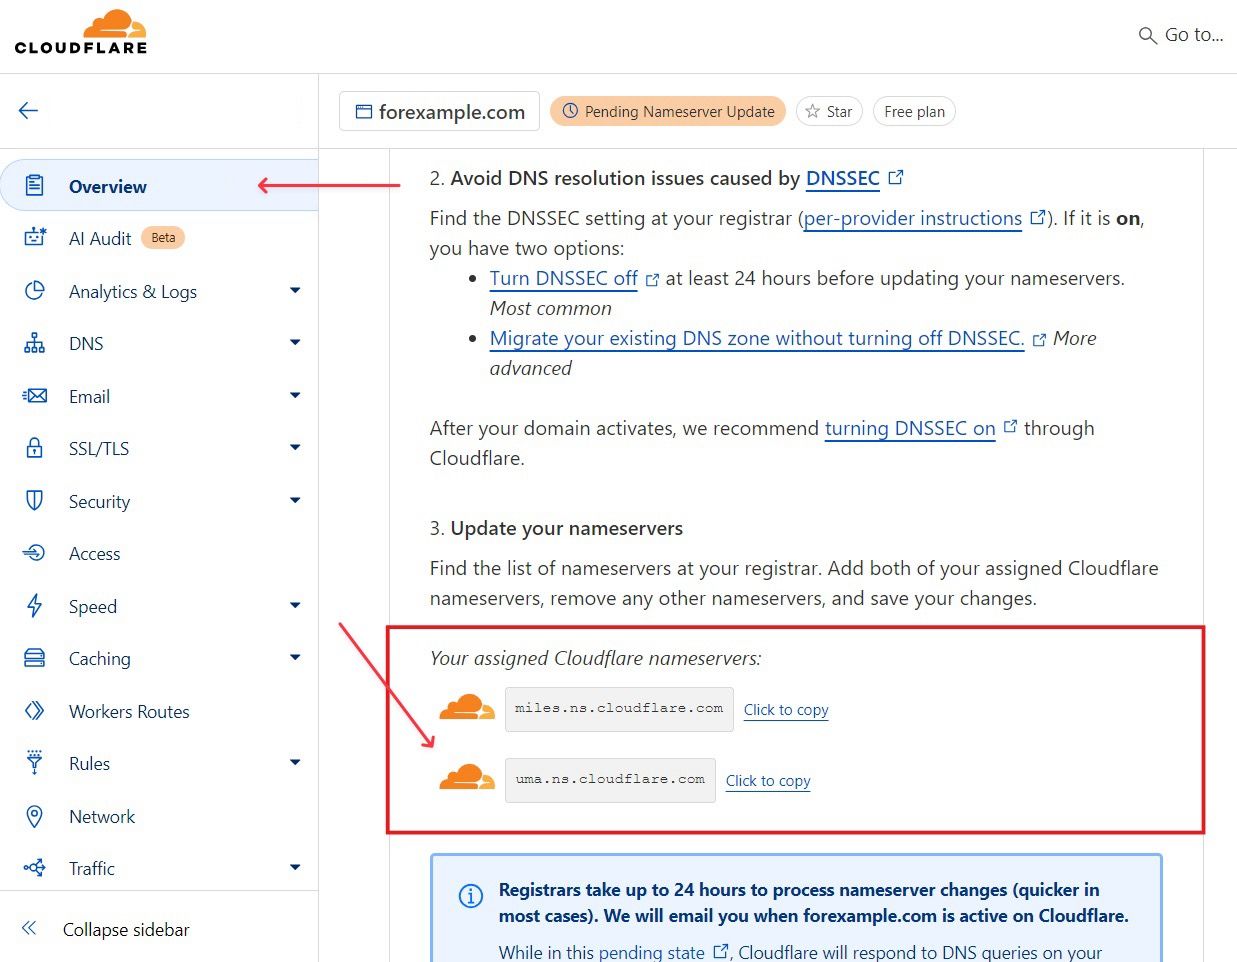
6. Return to the "Domain Registration" section and enter the two copied ns records.
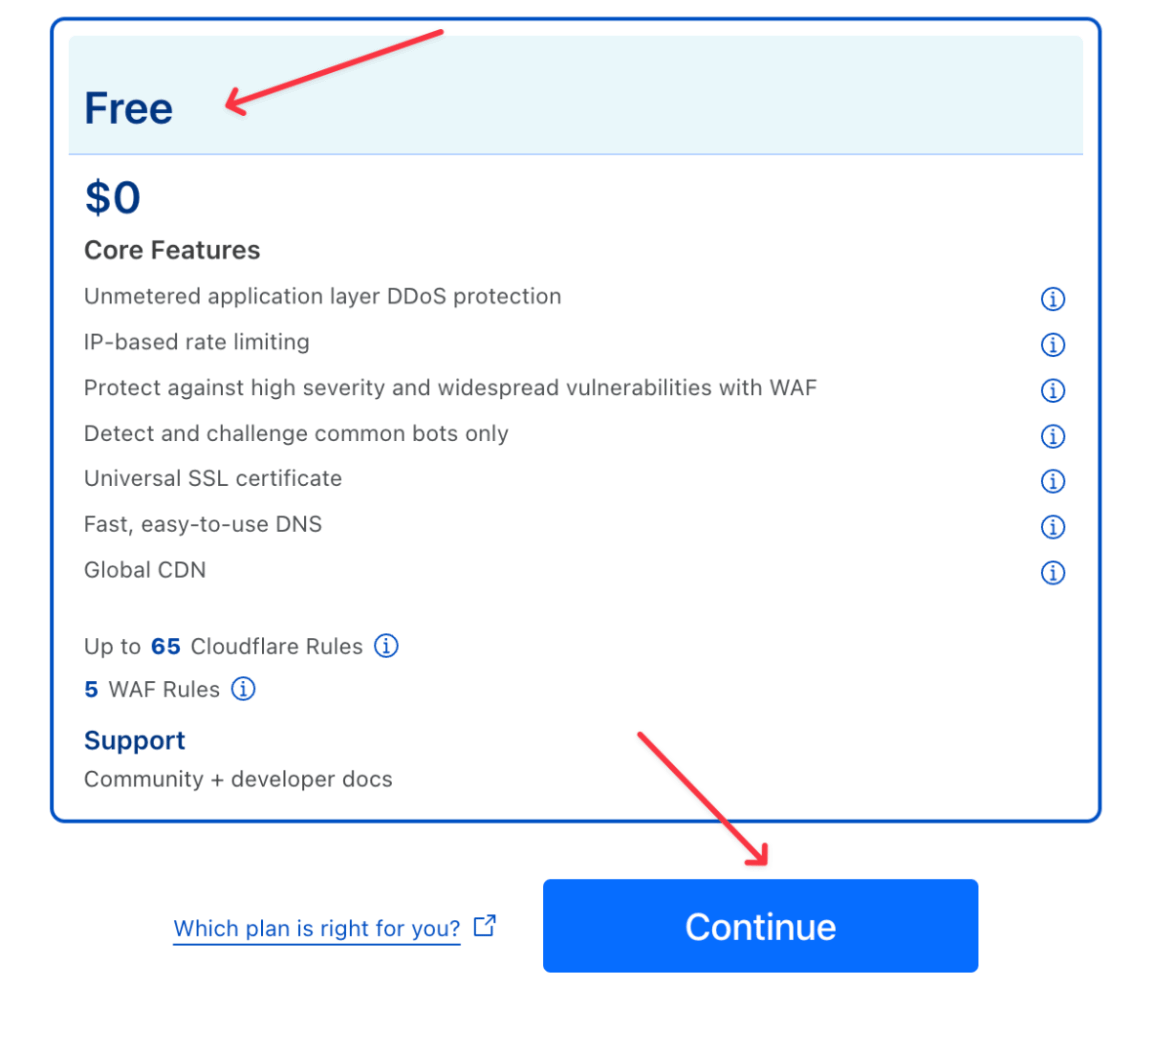
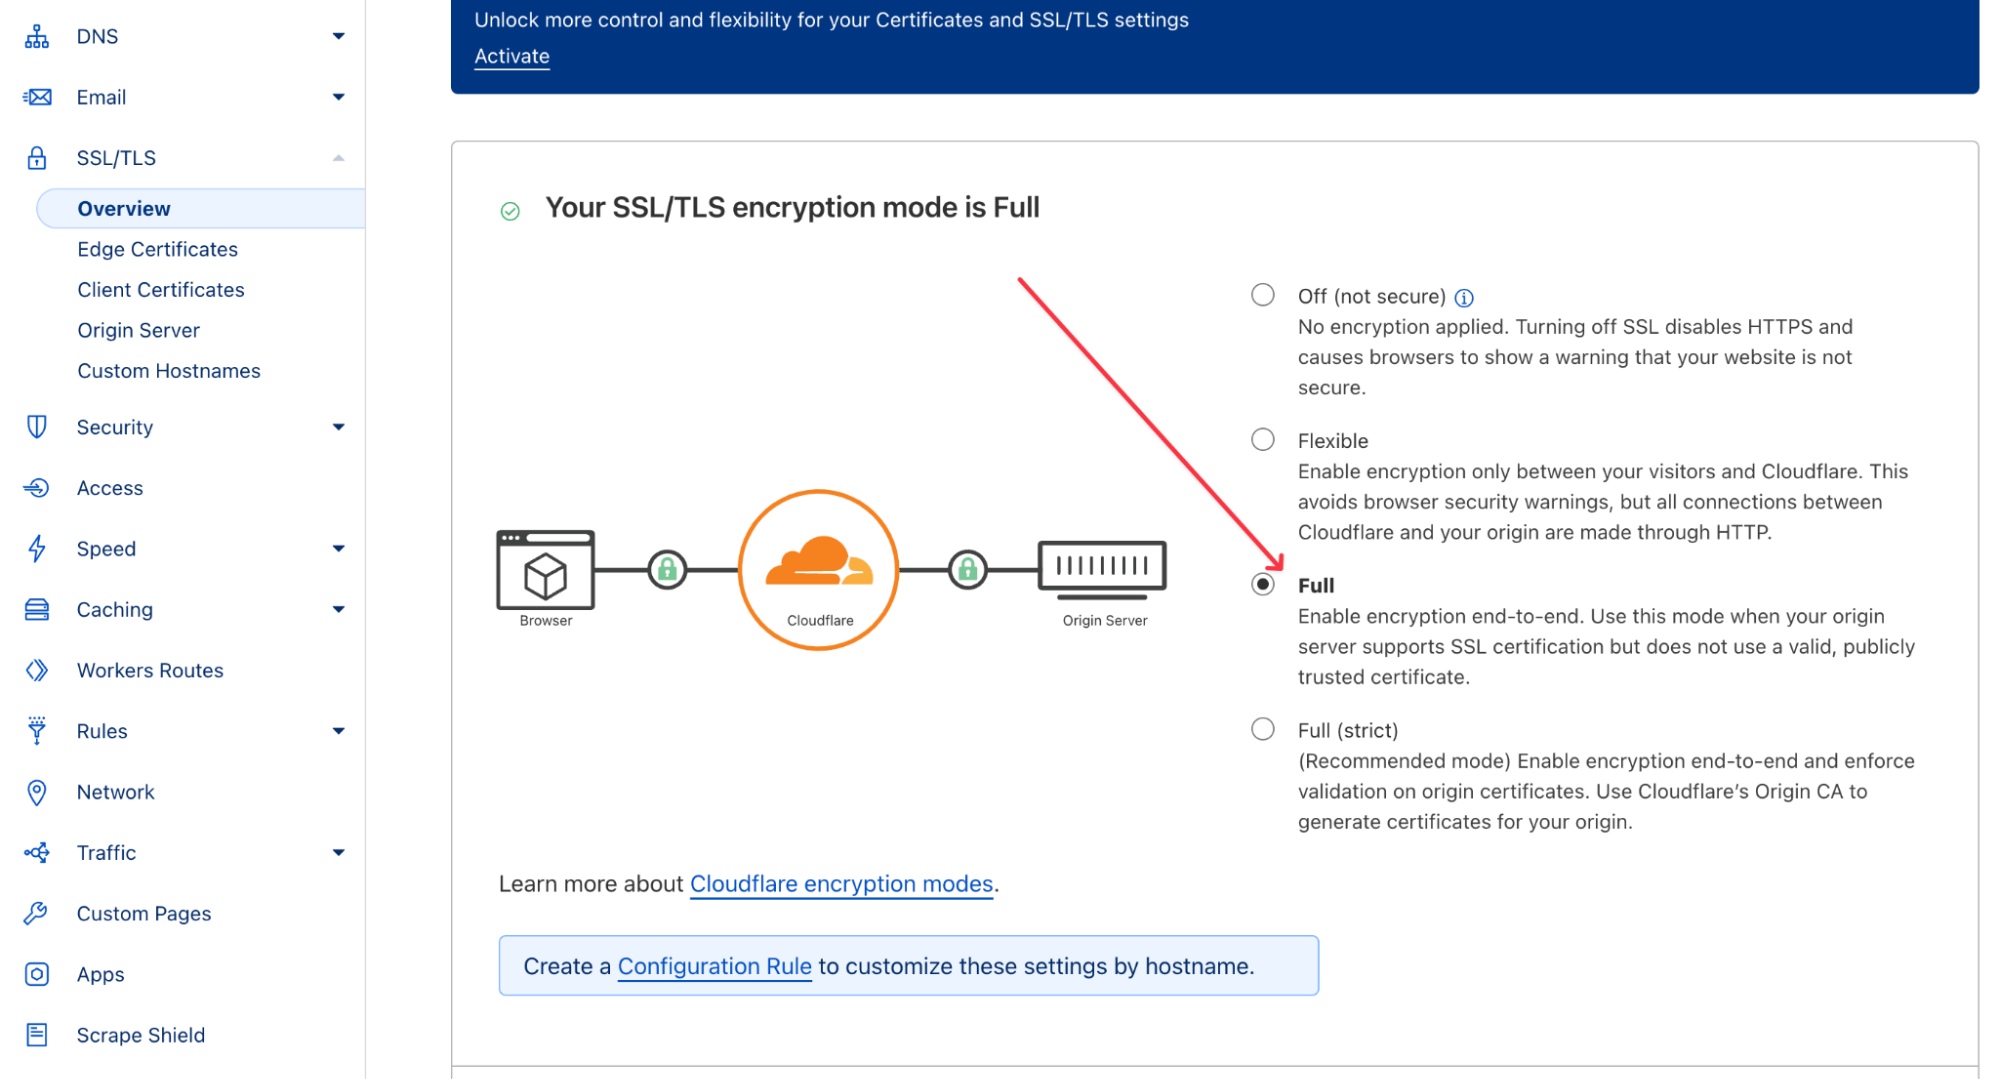
7. Return to "Account Home," select your domain. In the changed menu, go to "SSL/TLS" → "Overview." If the encryption parameter is set to "Flexible", change it to "Full".
8. Wait for the domain connection to complete.
Cloaking setup
Cloaking is a technology used to mask the affiliate link or offer from moderators of social networks and marketplaces. It allows moderators and non-target traffic (including bots) to be redirected to a pre-lander (White Page), while the target audience is redirected to the offer (Black Page). Most PWA creation services provide their own cloaking options or ready-made solutions based on Keitaro or Adspect.
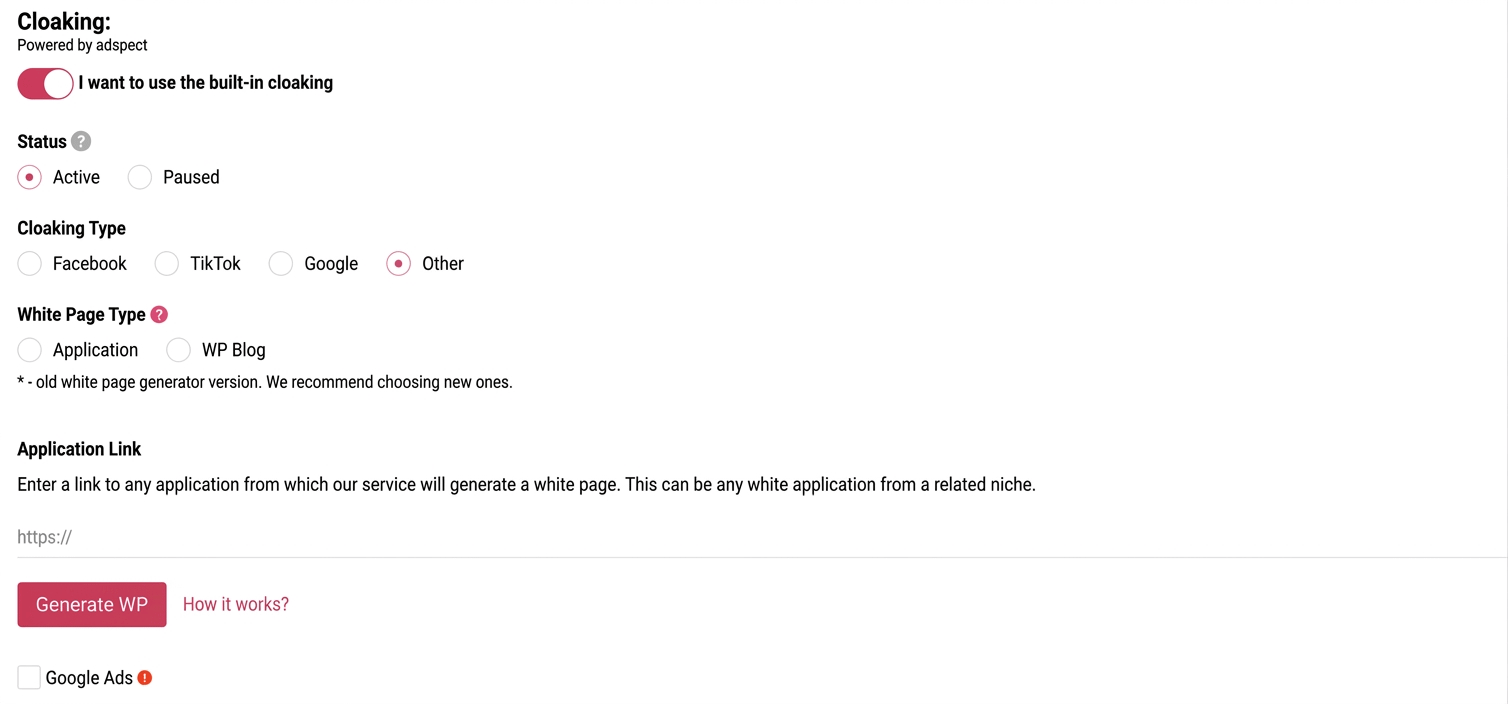
An integrated cloaking is available in PWA.market and can be used to launch ads on Facebook. To activate it, you need to:
- Turn on the toggle "I want to use the built-in cloaking";
- In the field below, provide a link to any application from Google Play.
Black Page setup
Black Page is the page players land on after clicking the creative. For greater trust, it often mimics an application page in the App Store or Google Play. On this page, the user can get acquainted with the application, download it, and subsequently navigate to the product website.
Given the user's final destination, it is recommended to emphasize the advantages in the app's description and reviews: bonuses, stable and fast withdrawals, major winnings, and "generous" slots.
Key elements of Black Page design:
- application name: the name of the game/slot or a combination of "Bookmaker name + games";
- author: the name of the bookmaking company;
- category: gambling, casino, betting, etc.;
- age restrictions: 18+;
- size: indicated in megabytes;
- current app version: can be indicated arbitrarily;
- number of installs: should be realistic so as not to deter the user;
- update date: current at the time of setup;
- PWA launch button;
- application description: detailed and appealing;
- update description: if necessary;
- user reviews: emphasizing positive aspects.
Selecting creatives for PWA
In working with web applications and converting users into players, creatives play a key role. In them, as in the app description, it is important to clearly outline the player's journey, emphasizing bonuses and available methods for account top-ups.
Traffic is often driven from Tier 3 GEOs, where players encounter difficulties in registration and product usage, even if the creative generated their interest. This leads to a low user retention rate: registered players do not understand what to do next or where to find their bonuses. To increase their engagement and improve the interaction experience, it is necessary to "hand-hold" each player: show the path from registration to deposit, and then demonstrate a major win on the second or third bet.
Creatives can be developed independently, based on analogs, or purchased through spy services.
After setting up the PWA and creating the creative, you can proceed to work with the Facebook ad account.
Facebook Ad account setup
Acquiring an ad account
Facebook accounts can be purchased or farmed independently. When creating an account, it is crucial to use only clean payment methods and IP addresses that have not previously been used in blocked campaigns.
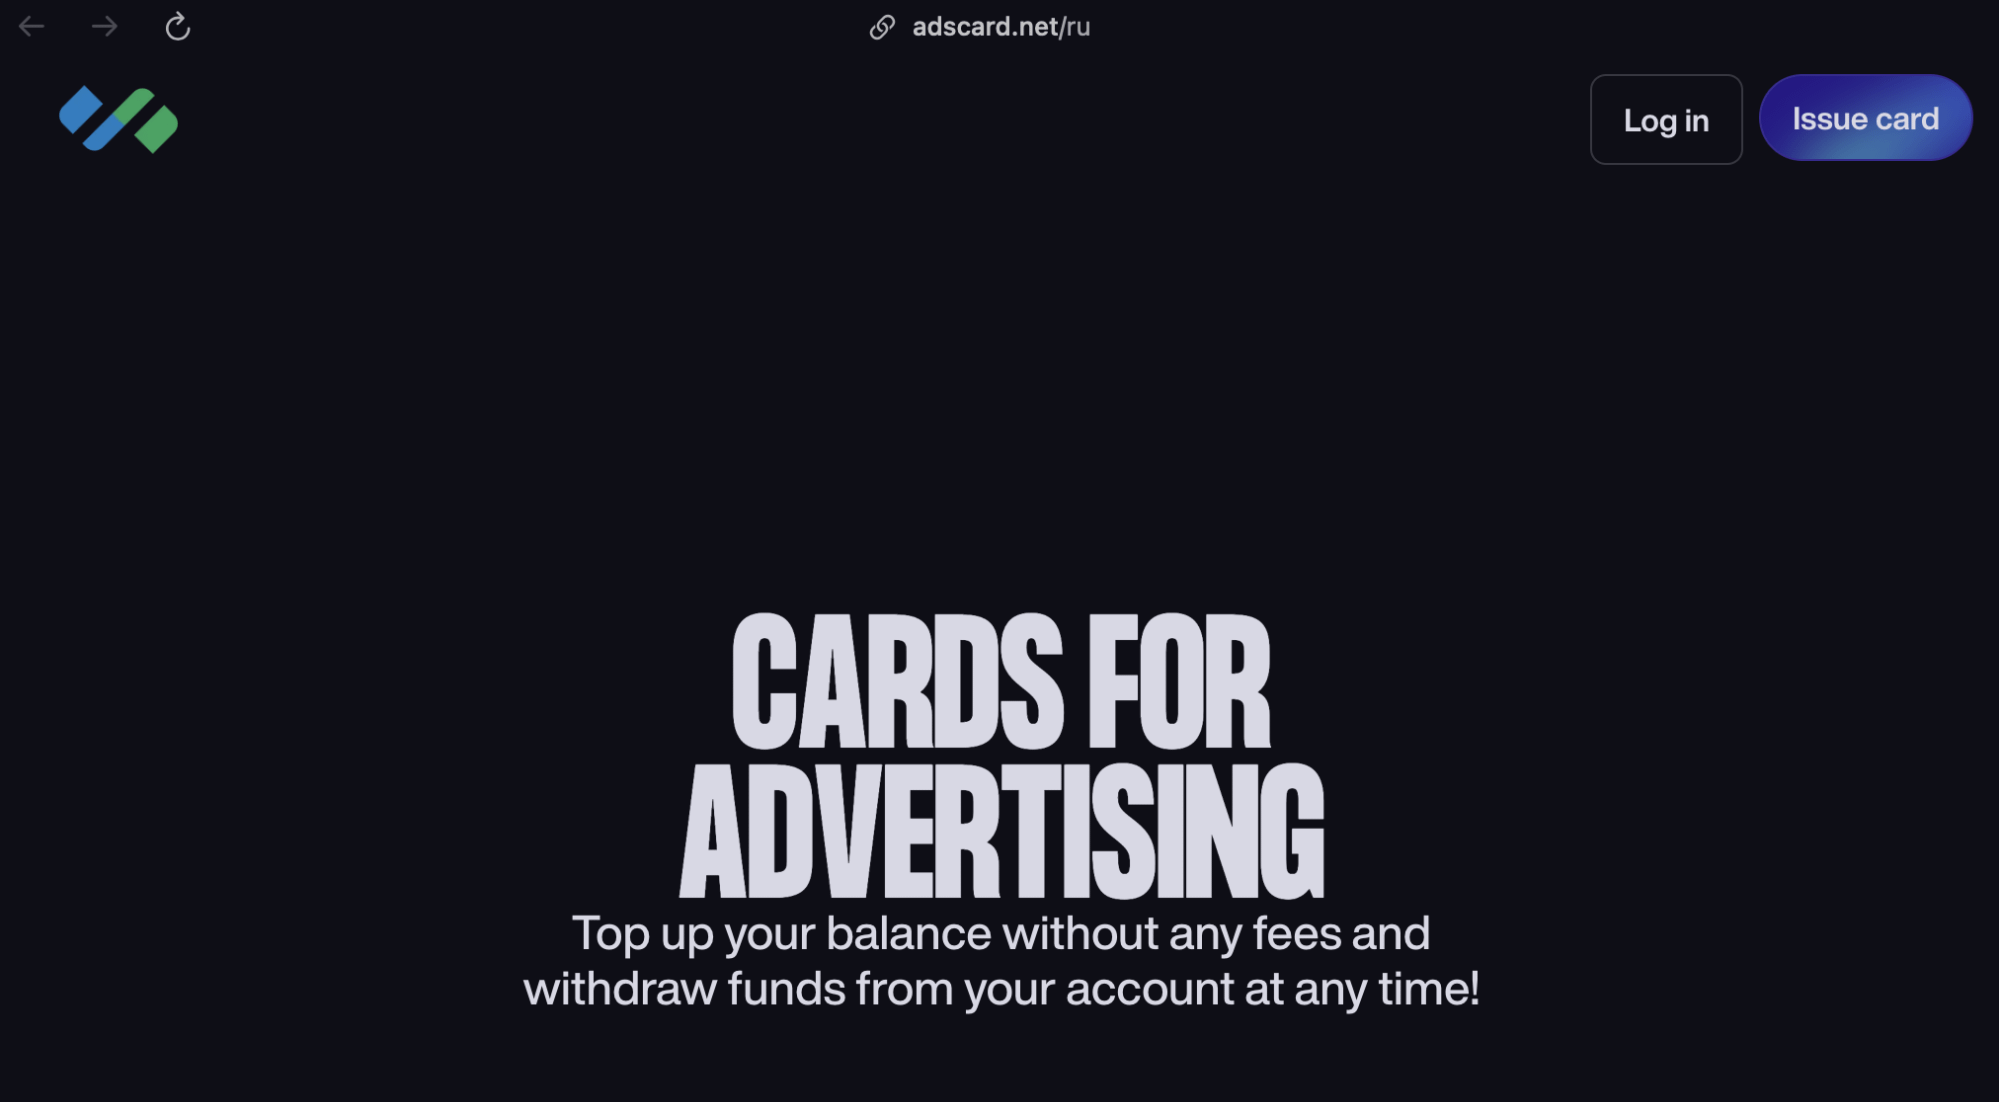
Before launching a campaign, it is necessary to add payment methods: create a virtual card on AdsCard and use anti-detect browsers to change the IP address.
Selecting a King Account
After acquiring the ad account, go to its Business Manager. Select the King Account (maternal account) — a Facebook account to which advertising accounts from other profiles are linked. Note that King is not an account type; it is a role in the linkage structure assigned to the most thoroughly prepared and trusted profile. Less reliable accounts are linked precisely to the King.
To link other accounts to the King, navigate to the "Add Accounts" tab, select each account individually, and in the work panel, choose the "Add People" option.
Payment setup
Link a payment card to each account. To do this, select the ad account and click "Add Payment Method". After adding the card, you must wait at least 3 hours — this reduces the likelihood of receiving a PHL (Permanent Hard Lock).
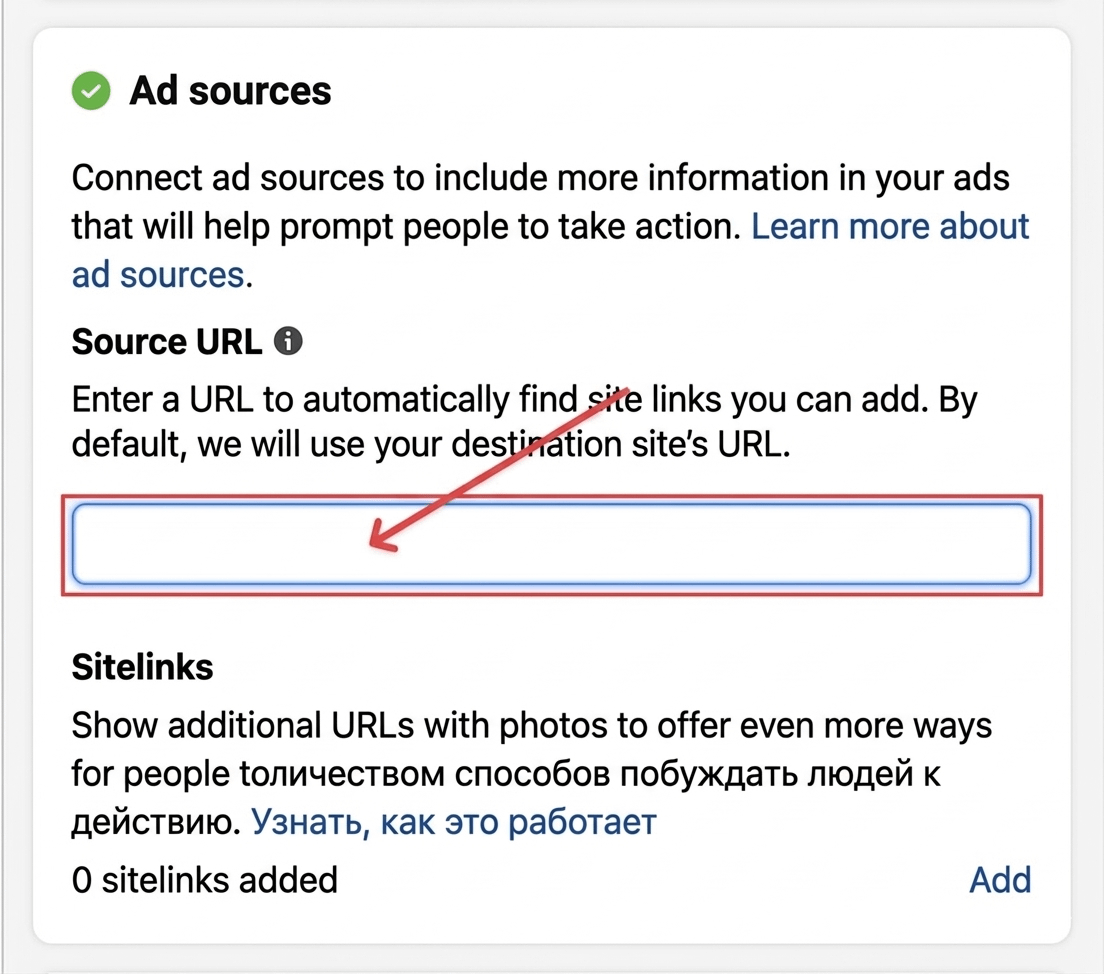
Launching the ad campaign
Navigate to the "Settings" section. In the Source URL field, add the link with sub-IDs. This link is located in the PWA service, under the "My PWA" section.
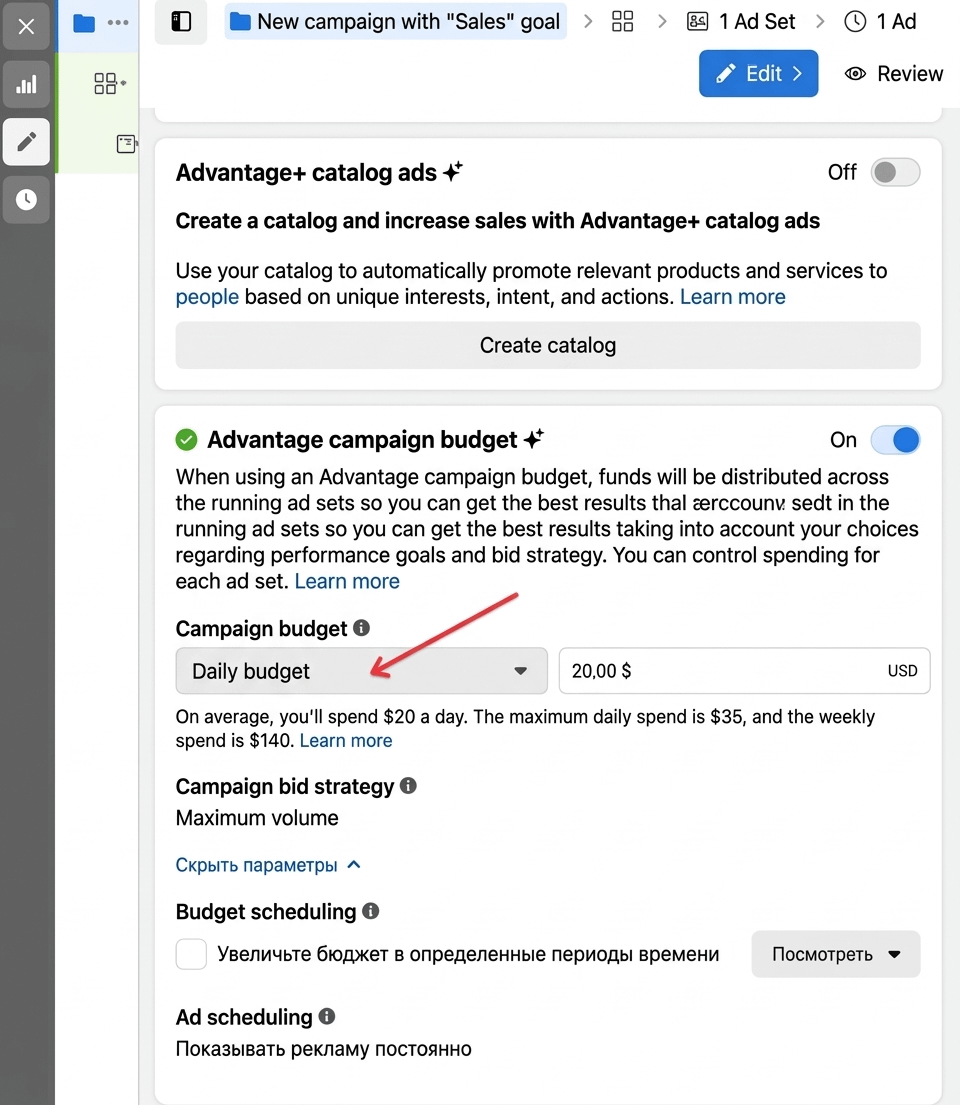
Expense optimization
In the campaign settings, activate "Advantage Campaign Budget" to optimize expenses and distribute funds among the ad sets. In the "Campaign Budget" field, set the "Daily Budget" depending on the money allocated for the launch.
Targeting setup
The target audience consists of users interested in betting, sports, casinos, cryptocurrencies, trading, and earning money.
Understanding the preferences of gamblers is a key aspect of a successful ad launch. At the initial stage, it is recommended to set the broadest possible parameters and gradually narrow them based on conversion analysis.
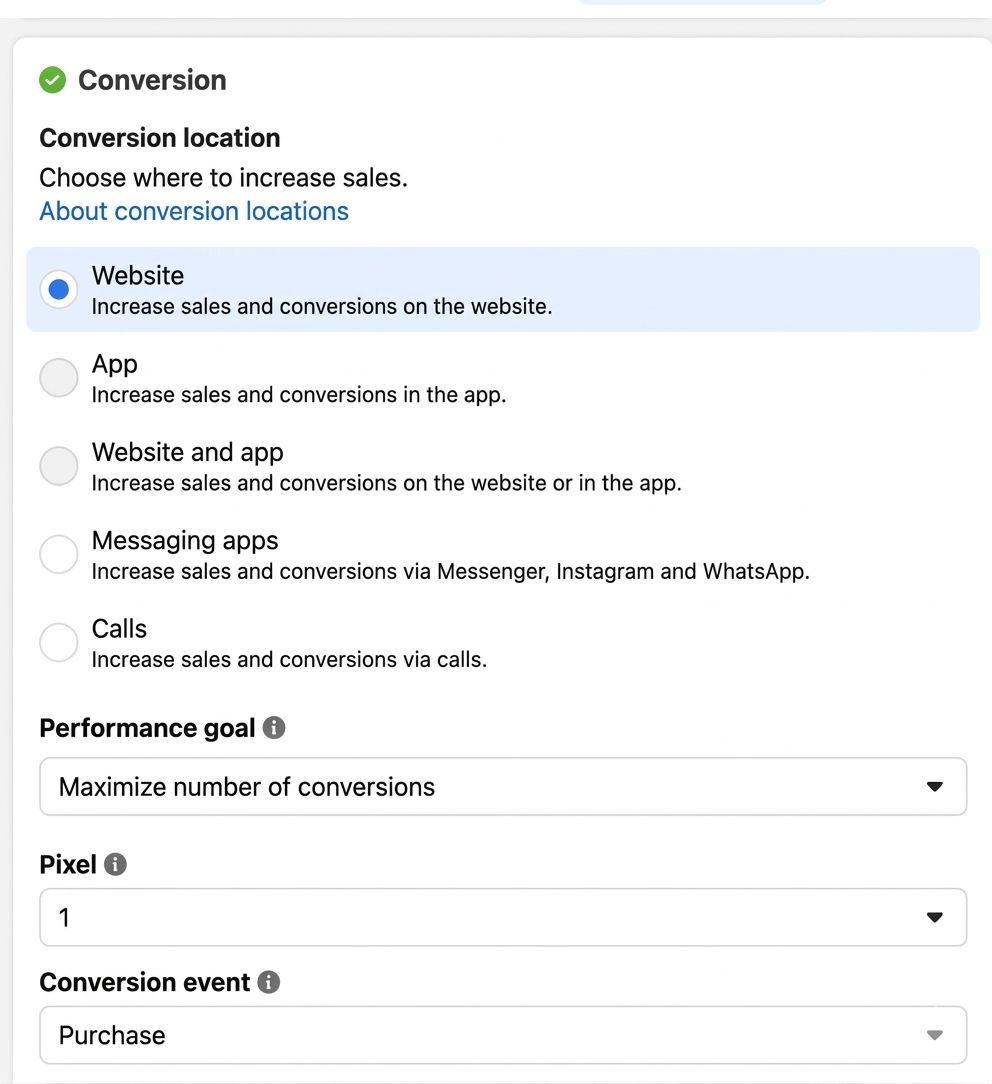
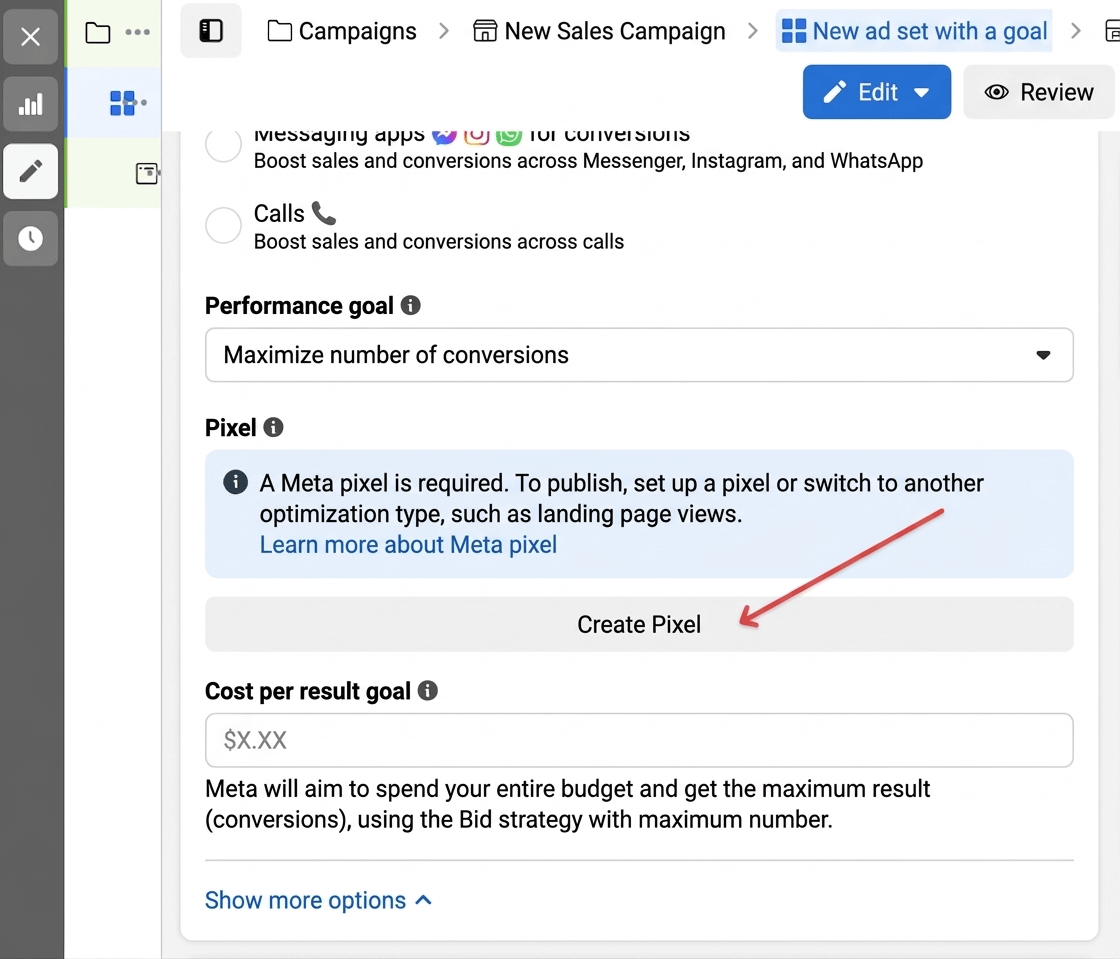
The advertising campaign is assigned the following parameters:
- "Conversion" → "Website";
- "Performance Goal" → "Maximize Number of Conversions";
- "Pixel": the previously created pixel is assigned to all accounts;
- "Conversion Event" → "Purchase";
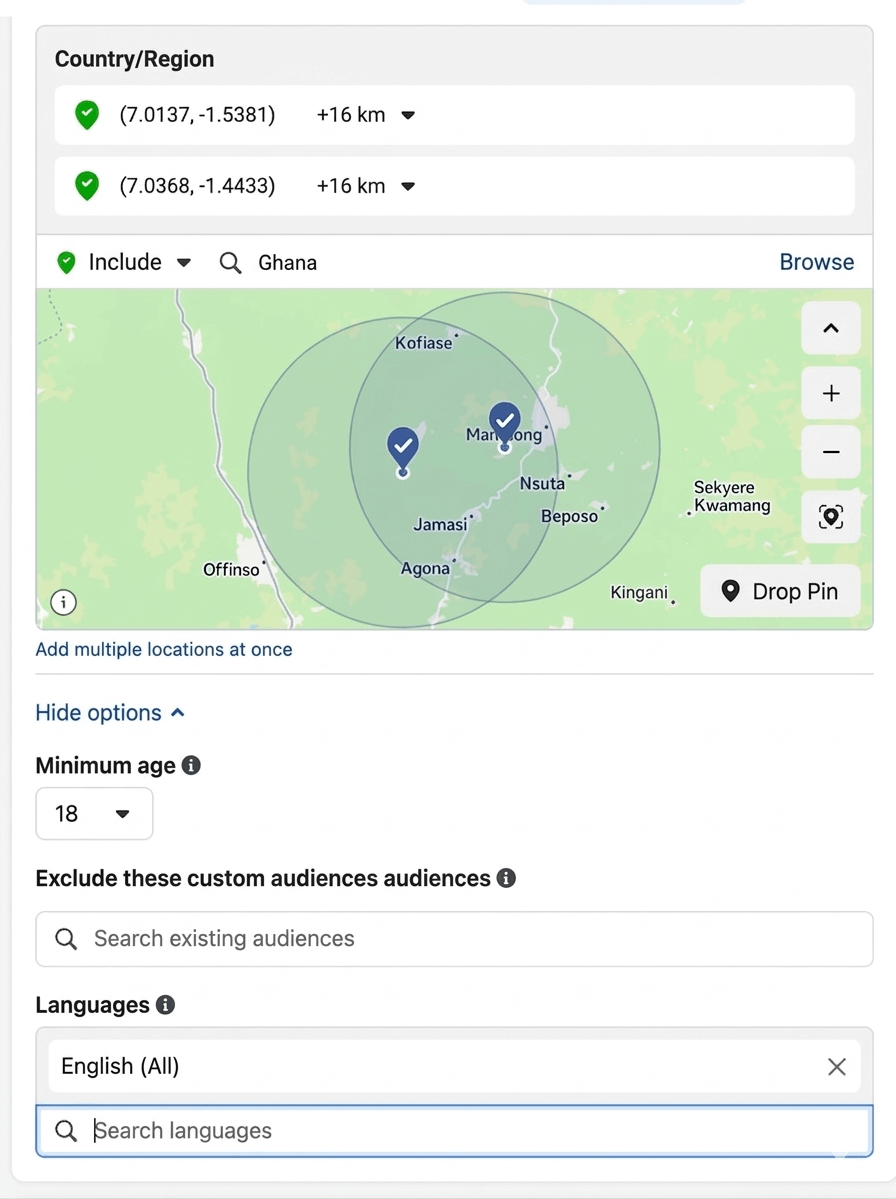
- Location: GEO for targeting;
- Language: the language of the selected GEO;
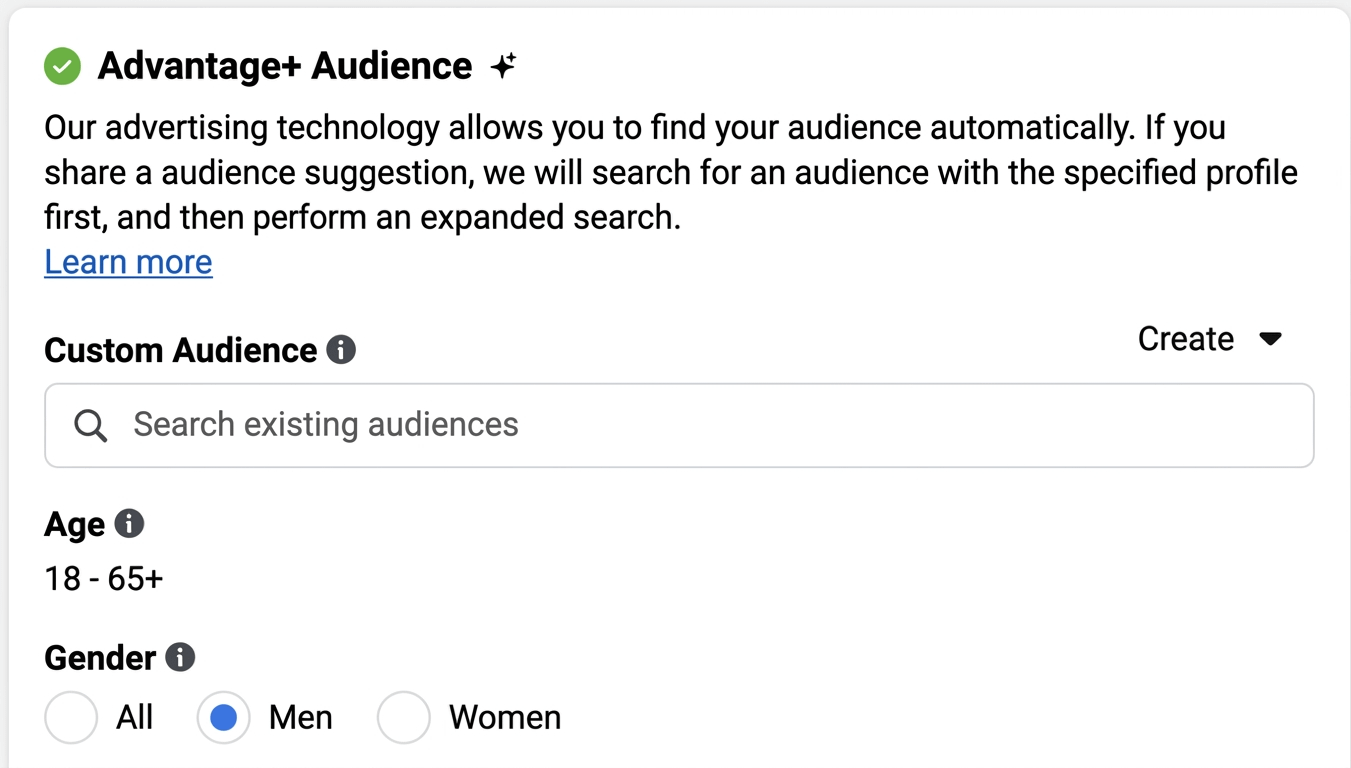
- Advantage + Audience: age and gender;
- Detailed Targeting: no changes.
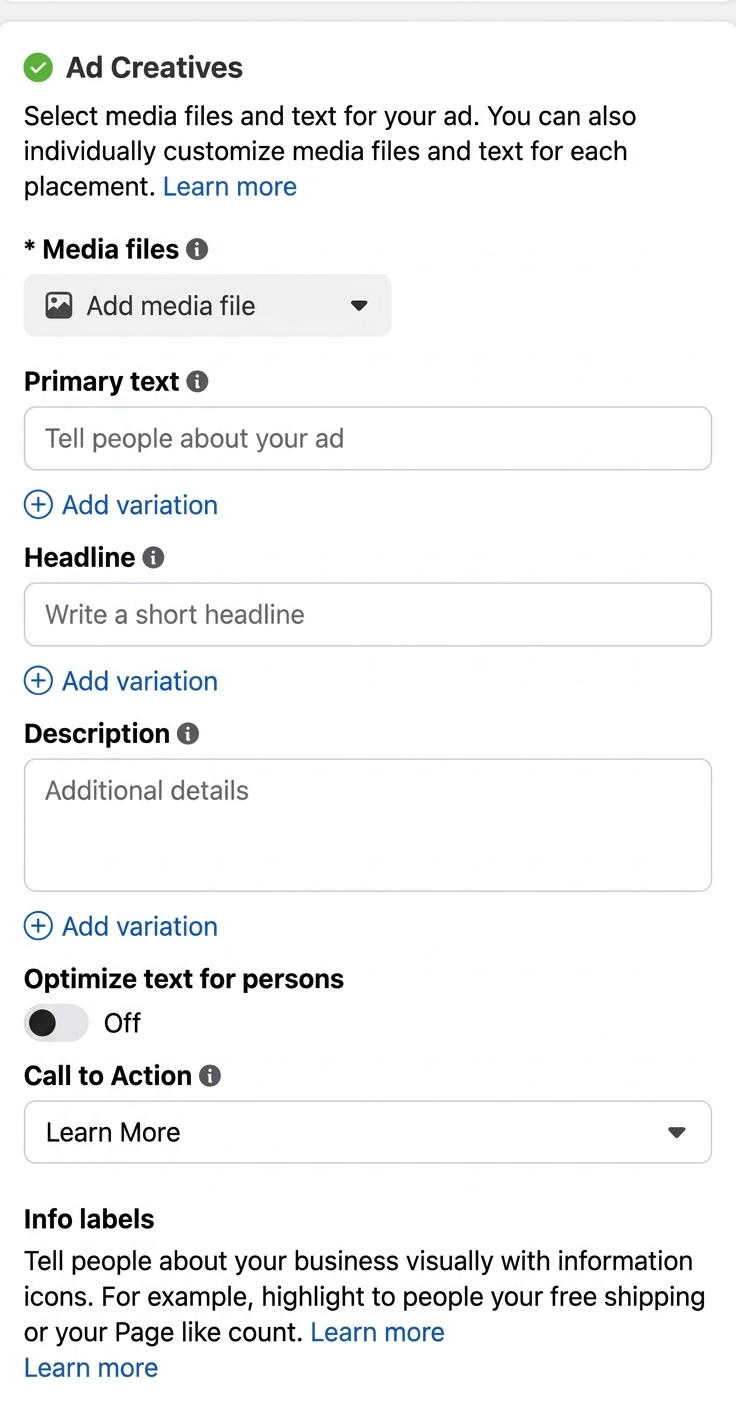
Creatives upload
When adding a creative, the following fields are filled out:
- "Ad Name";
- "Identity" → "Facebook Page";
- "Ad Setup" → "Create Ad".
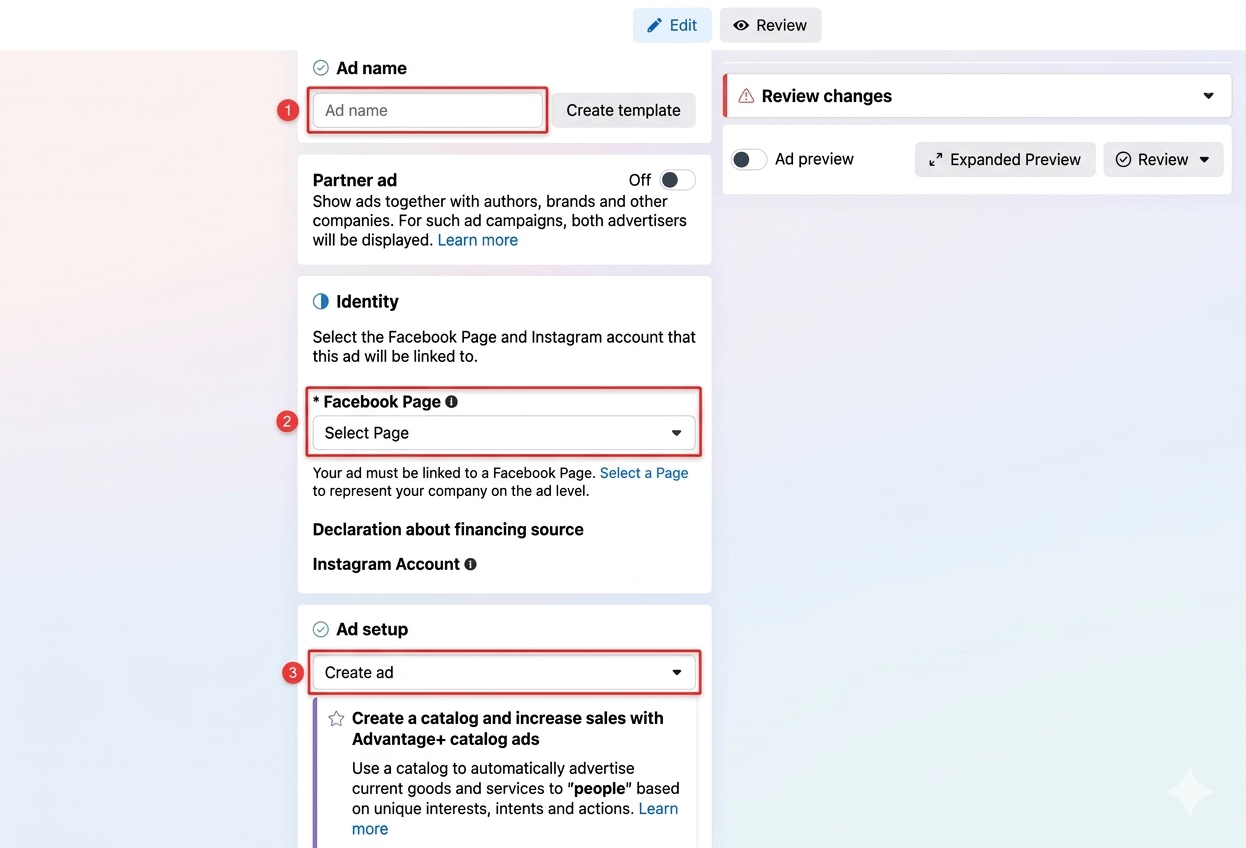
After uploading the creative, activate the "Full Optimization" option. After this, you can proceed to add the creative itself.
Targeting setup recommendations
At the initial stage, set targeting for the broadest possible target audience. After launching the campaign, regularly analyze its results: clicks, conversion, ROI.
If any ad sets show low effectiveness, they should be optimized or disabled. Remember to test various hypotheses and approaches to creatives, budget, texts, and target audiences — this way, you will quickly determine the most effective combinations and funnels.
Using PWA helps increase user engagement, which directly impacts conversion.
Setting up Pixel and postbacks for FB ad campaign learning
Pwa.market and other services provide the ability to set up your own Facebook Pixel and postbacks.
A Pixel is a web tool used to analyze user behavior on a website or Black Page, track their target actions, and create an audience profile based on the principle of whether they downloaded or did not download the application.
For this, the pixel is configured on the same button used to install the PWA on the user's device. Then, data about users who registered and made a deposit is transmitted to the Facebook ad account via postbacks.
This data helps to train the ad campaign and target it toward the most relevant audience.
How to set up the Facebook Pixel:
- In the Facebook ad account, go to the "Ad Sets" section in Meta Ads and create the account pixel, then copy its number.
2. Go to pwa.market, and in the application settings, select "I want to connect analytics" and check the box next to the "Facebook" option.
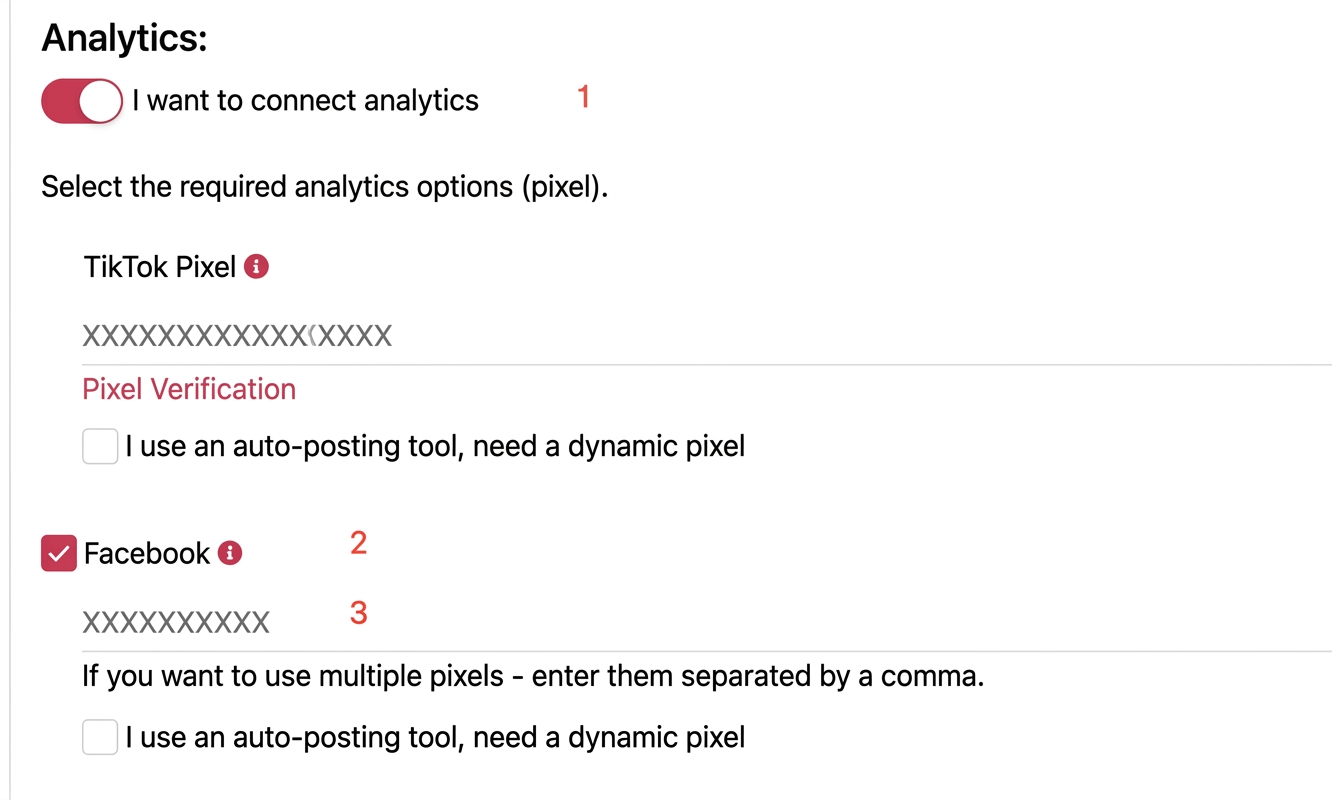
4. Verify the pixel. To do this, return to the Facebook account, select manual code installation, and add the parameter /?no_cloak=1 to the link.
When sending a test event via the specified link to the PWA and reopening the pixel, the status should change to "Active".
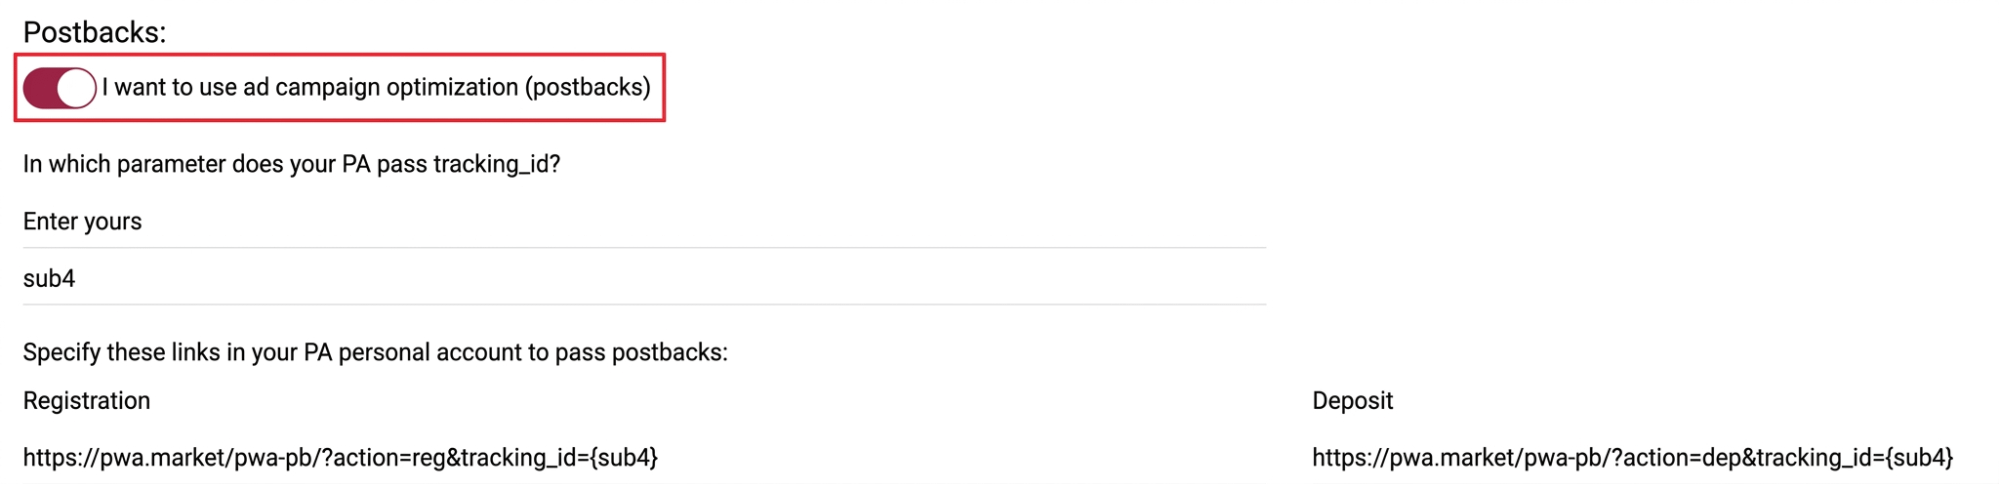
The remaining step is to configure the data in the PWA service. For the Facebook ad campaign to be trained not only by the pixel but also by other events, you need to transmit them from the advertiser to the PWA service. This can be done directly or through a tracker. In our case, the registration and deposit events are transmitted.
To transmit events directly to the PWA service, you must activate the toggle "I want to use ad campaign optimization (postbacks)".
The postbacks must be set up in the affiliate program's personal account in the event fields for "Registration" and "First Deposit".

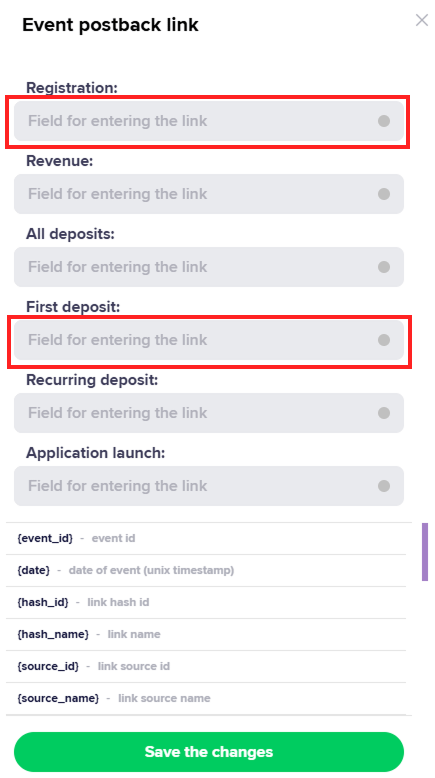
At this point, the pixel and postback setup for optimization is complete, and the ad campaign is ready to launch.
Setting up push notifications
Push notifications are an important tool for increasing engagement. They can be used to motivate users who have already installed the app or registered but have not yet made a first deposit, and also to encourage players to make repeat deposits.
Every push notification should be informationally useful and create a sense of urgency, rather than just reminding the user that the app exists on their device.
In pushes related to actions, use reminders about bonuses. In timed mailings, you can mention popular slots with frequent winnings or notifications about a major win with a screenshot of the amount.
To set up push notifications, in the "My PWA" section, click the button with the bell image. Then configure the push groups: "By Schedule" and "By Event".

When setting up pushes by schedule, choose the days of the week and the time of sending. It is important to consider the time difference between you and the players — pushes sent at an inappropriate time may go unnoticed or even lead to app deletion.
When setting up pushes by event, three main actions are available: installation, registration, and deposit. A time interval between the event and the push send is also available. Example: a notification sent one hour after the application installation.
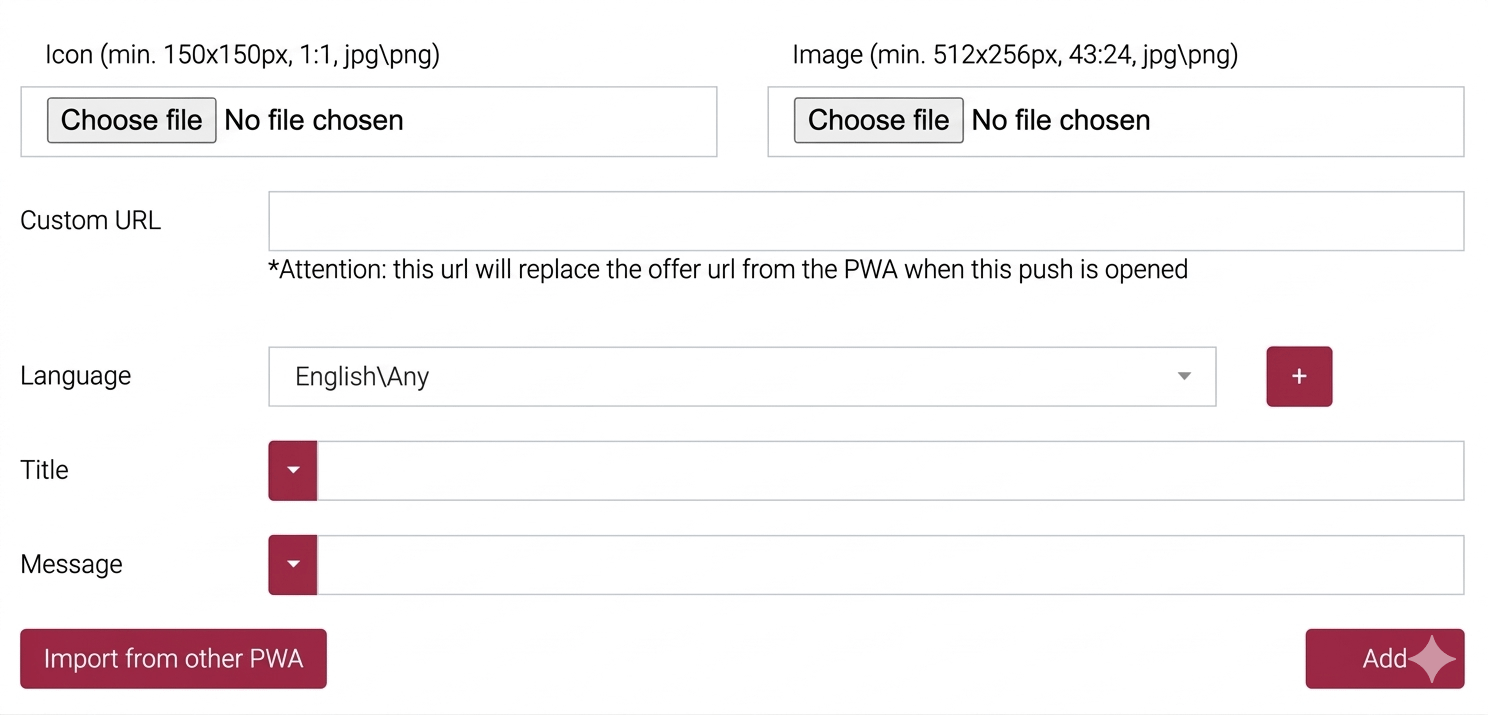
For each push type, you can configure:
- the notification icon displayed in the window;
- the displayed banner when the push is "expanded";
- the URL address that opens on click;
- the notification language (especially important when working with multiple GEOs);
- the title displayed in the window;
- the notification text.
After setup, the push notifications will operate according to the specified parameters and offers.
Integrating PWA with the Keitaro tracker
A tracker is a useful tool for analyzing and optimizing advertising campaigns. Its use is not mandatory for the FB → PWA bundle, but it is recommended if you want to:
- use the built-in cloaking;
- track conversions in the personal account of the tracker and the PWA service;
- segment traffic by categories.
The tracker can be custom-developed or third-party. As an example, let's consider integrating PWA with the Keitaro tracker.
Main steps:
- Set up the tracker with the affiliate program.
- Add the PWA service to the chain.
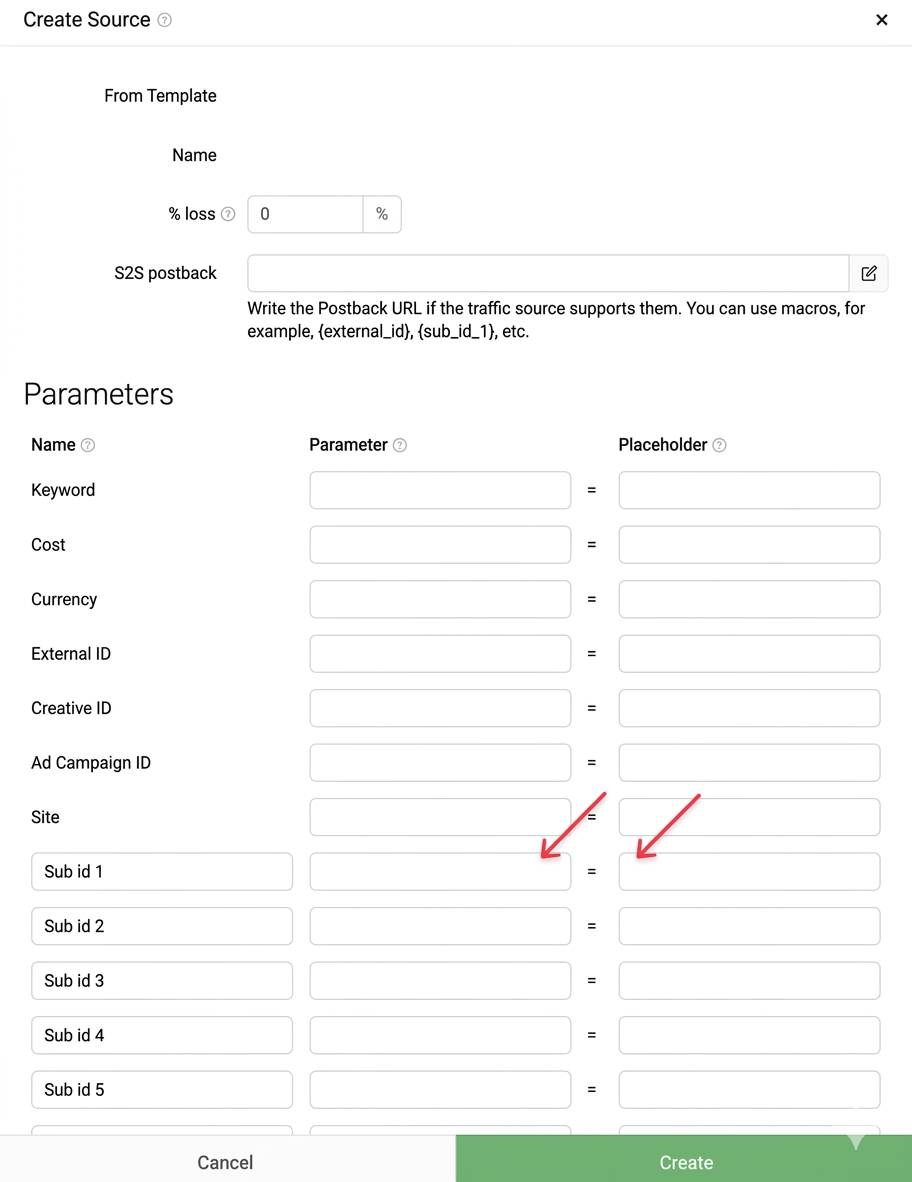
For correct operation, the offer must contain tracking_id — a unique identifier for the user who successfully installed the web application. This parameter can be passed through any sub. Example of macro:
https://postback.com/?sub_id_1={tracking_id}
In the "Parameters" section, substitute the value {tracking_id} into the "Placeholder" field for sub_id_1.
3. Return to the PWA settings and fill in the "Postback" section, specifying the parameter chosen in Keitaro.
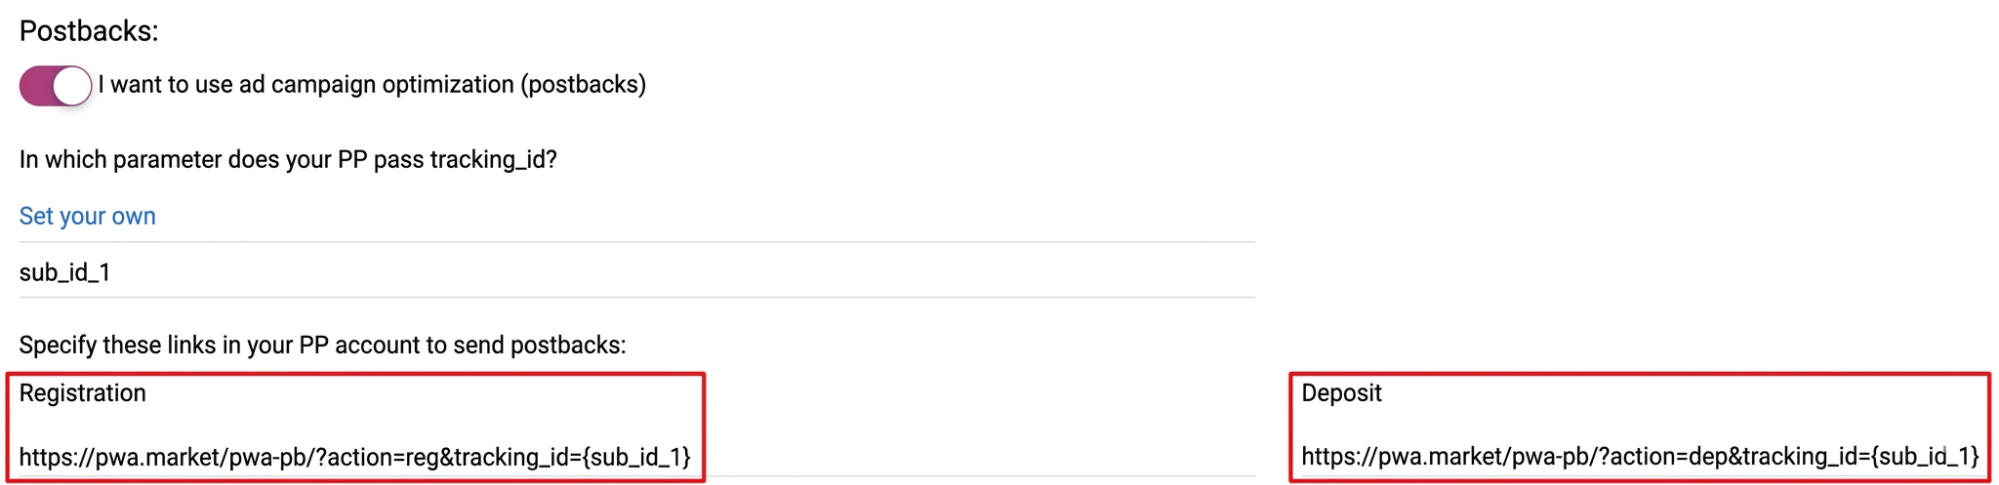
4. Generate links for the "Registration" and "Deposit" events, copy them, and paste them into the S2S postbacks section using the GET method. Then, in the field with the registration event link, check the box next to "Sale" in the Statuses row. Finally, in the section with the deposit event link, select the item "Lead" in the Statuses row.
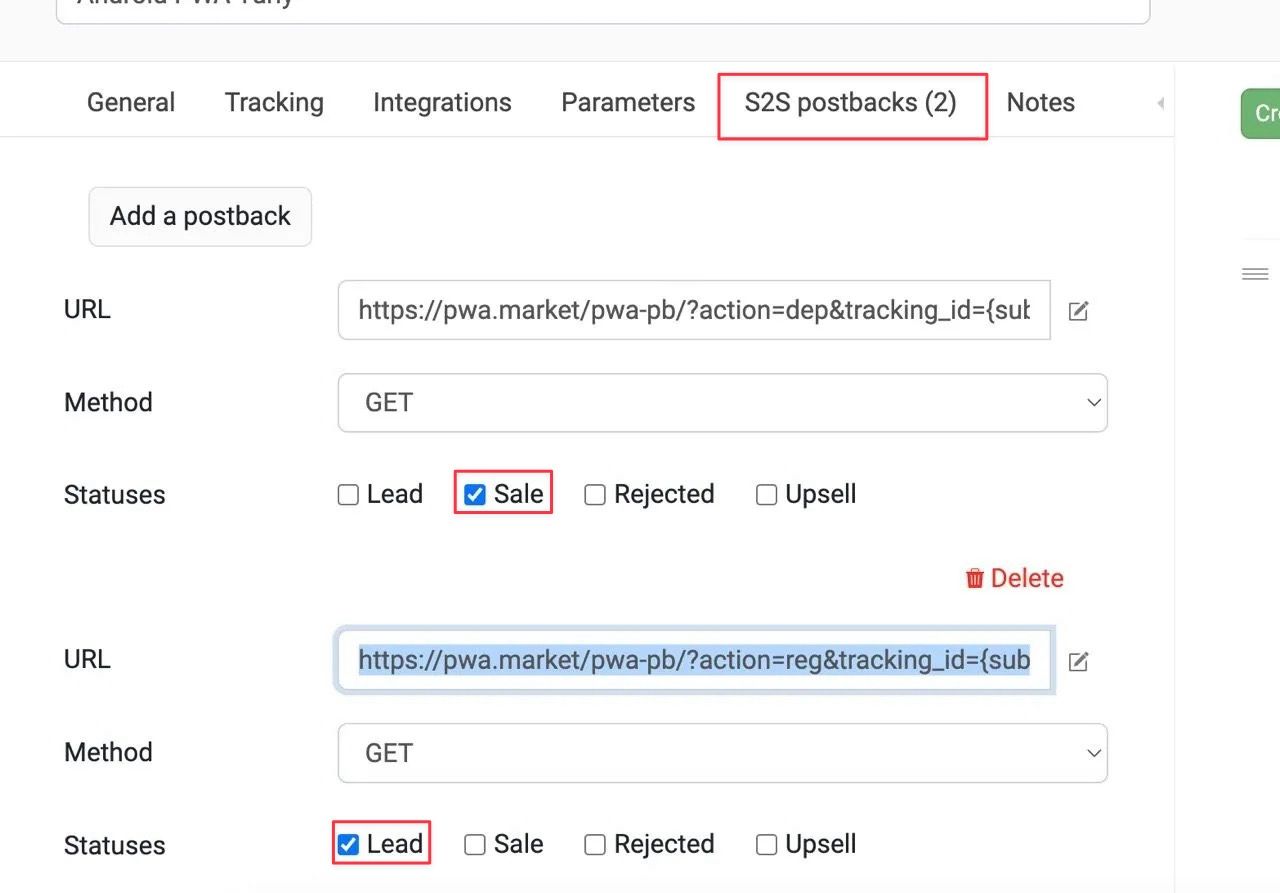
The integration of PWA with the tracker is now successfully completed.
Checklist
To ensure that the PWA application setup was successful and you have taken all necessary steps, answer the questions on this checklist:
- Has the target GEO for traffic generation been clarified?
- Has the personal domain been linked to Cloudflare?
- Is the tracker set up for "multi-GEO"?
- Are the White Page and cloaking working correctly: are non-target GEOs and moderation traffic being sent to the pre-lander?
- Do the creatives and offer match the specifics of the selected GEO?
- Are the postbacks for registration and deposit working correctly?
- Is the application design attractive to players, and does it correspond to the advertising creative?
- Do the creatives match the language of the selected GEO and the local mentality?
- Are push notifications set up?
If the answer to all questions is positive — you are ready for a successful launch!
You can also read

1win Partners Advertising Tools: Referral Link and Promo Code
We explain how to create and set up a referral link and promo code in the personal account of the 1win Partners program.
 56
56
Referral Link Updates
How to avoid referral link restrictions imposed by moderation algorithms? We share effective tips.
35
IPL: A Guide to India’s Biggest Sporting Event
Cricket is India’s greatest passion and a goldmine for betting traffic. We reveal all the secrets of working with the IPL audience in our in-depth guide.
 3
3